
Step by step guide
Welcome aboard! Now that you have the Operations Center system, you might be wondering: “Where do I start?”
This module is here to help. We’ll walk you through the process of getting Operations Center up and running using a common, real-world example—work ticketing. Step by step, you’ll learn how to set up a board, configure it for your team, and get everything in place so you can hit the ground running.
Let’s dive in and get started!
Step 1: Building Your First Board in Operations Center
Operations Center is designed to grow with your team through incremental configuration. The key idea? Start small and build as you go. Begin with the basics, get feedback from your team, and evolve the setup based on real-world needs.
The platform is intentionally flexible and highly customizable. That’s a great strength—but it also means there’s often more than one “right” way to solve a problem. Don’t get stuck trying to perfect the setup from day one. Instead of spending dozens (or even hundreds) of hours planning every detail before launch, we recommend a faster and more effective approach:
Configure a couple of complete, end-to-end processes and let field feedback guide your next steps.
A Simple Approach to Configuration
When setting up your board, follow this general order:
- Board
- Categories
- Fields
- Layouts
These are the core building blocks of Operations Center. Together, they define the purpose, process, and language of your team's work.
Other features like tags, checklists, and recurrences can be added later for additional functionality—but they’re not essential to get started.
Translating Team Work into Operations Center
Let’s walk through how to begin this process.
First, define your use case—the purpose or system the team needs to manage. This determines the need for a new board. In this module, we’ll use the Work Ticketing template as our example. It’s a great starting point for teams managing maintenance tasks or service requests across systems and sites.
Once you know the purpose of the board, identify the process these tasks will follow. This helps shape your board’s layout.
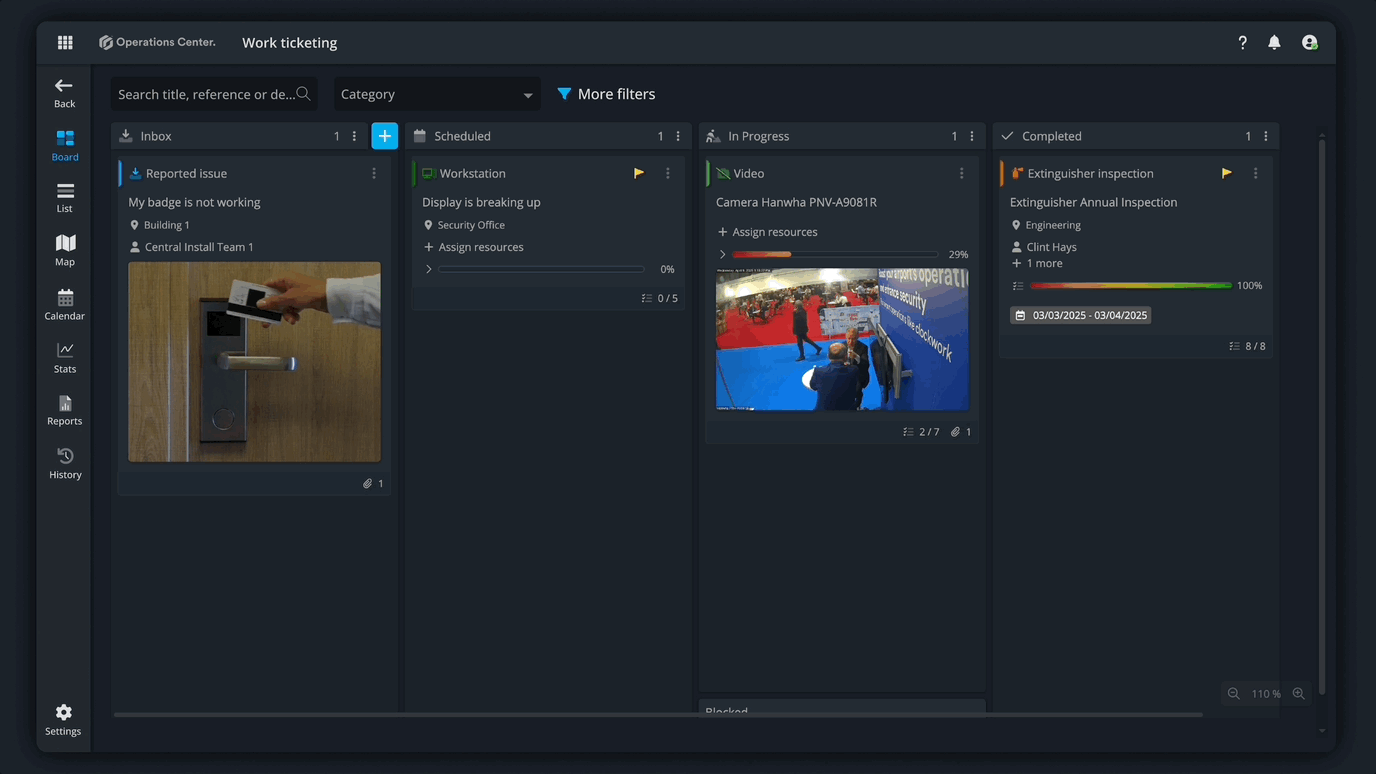
Often, the process is simple—something like “Doing” and “Done”. You’ll use columns and lanes to visually represent the workflow.
Columns reflect the stages of a task. For example, a work item might start in an Inbox, move to In Progress when a technician starts the job, and end in Completed.
Columns can also mark handoffs between teams, such as from a Network Technician to a Service Technician.
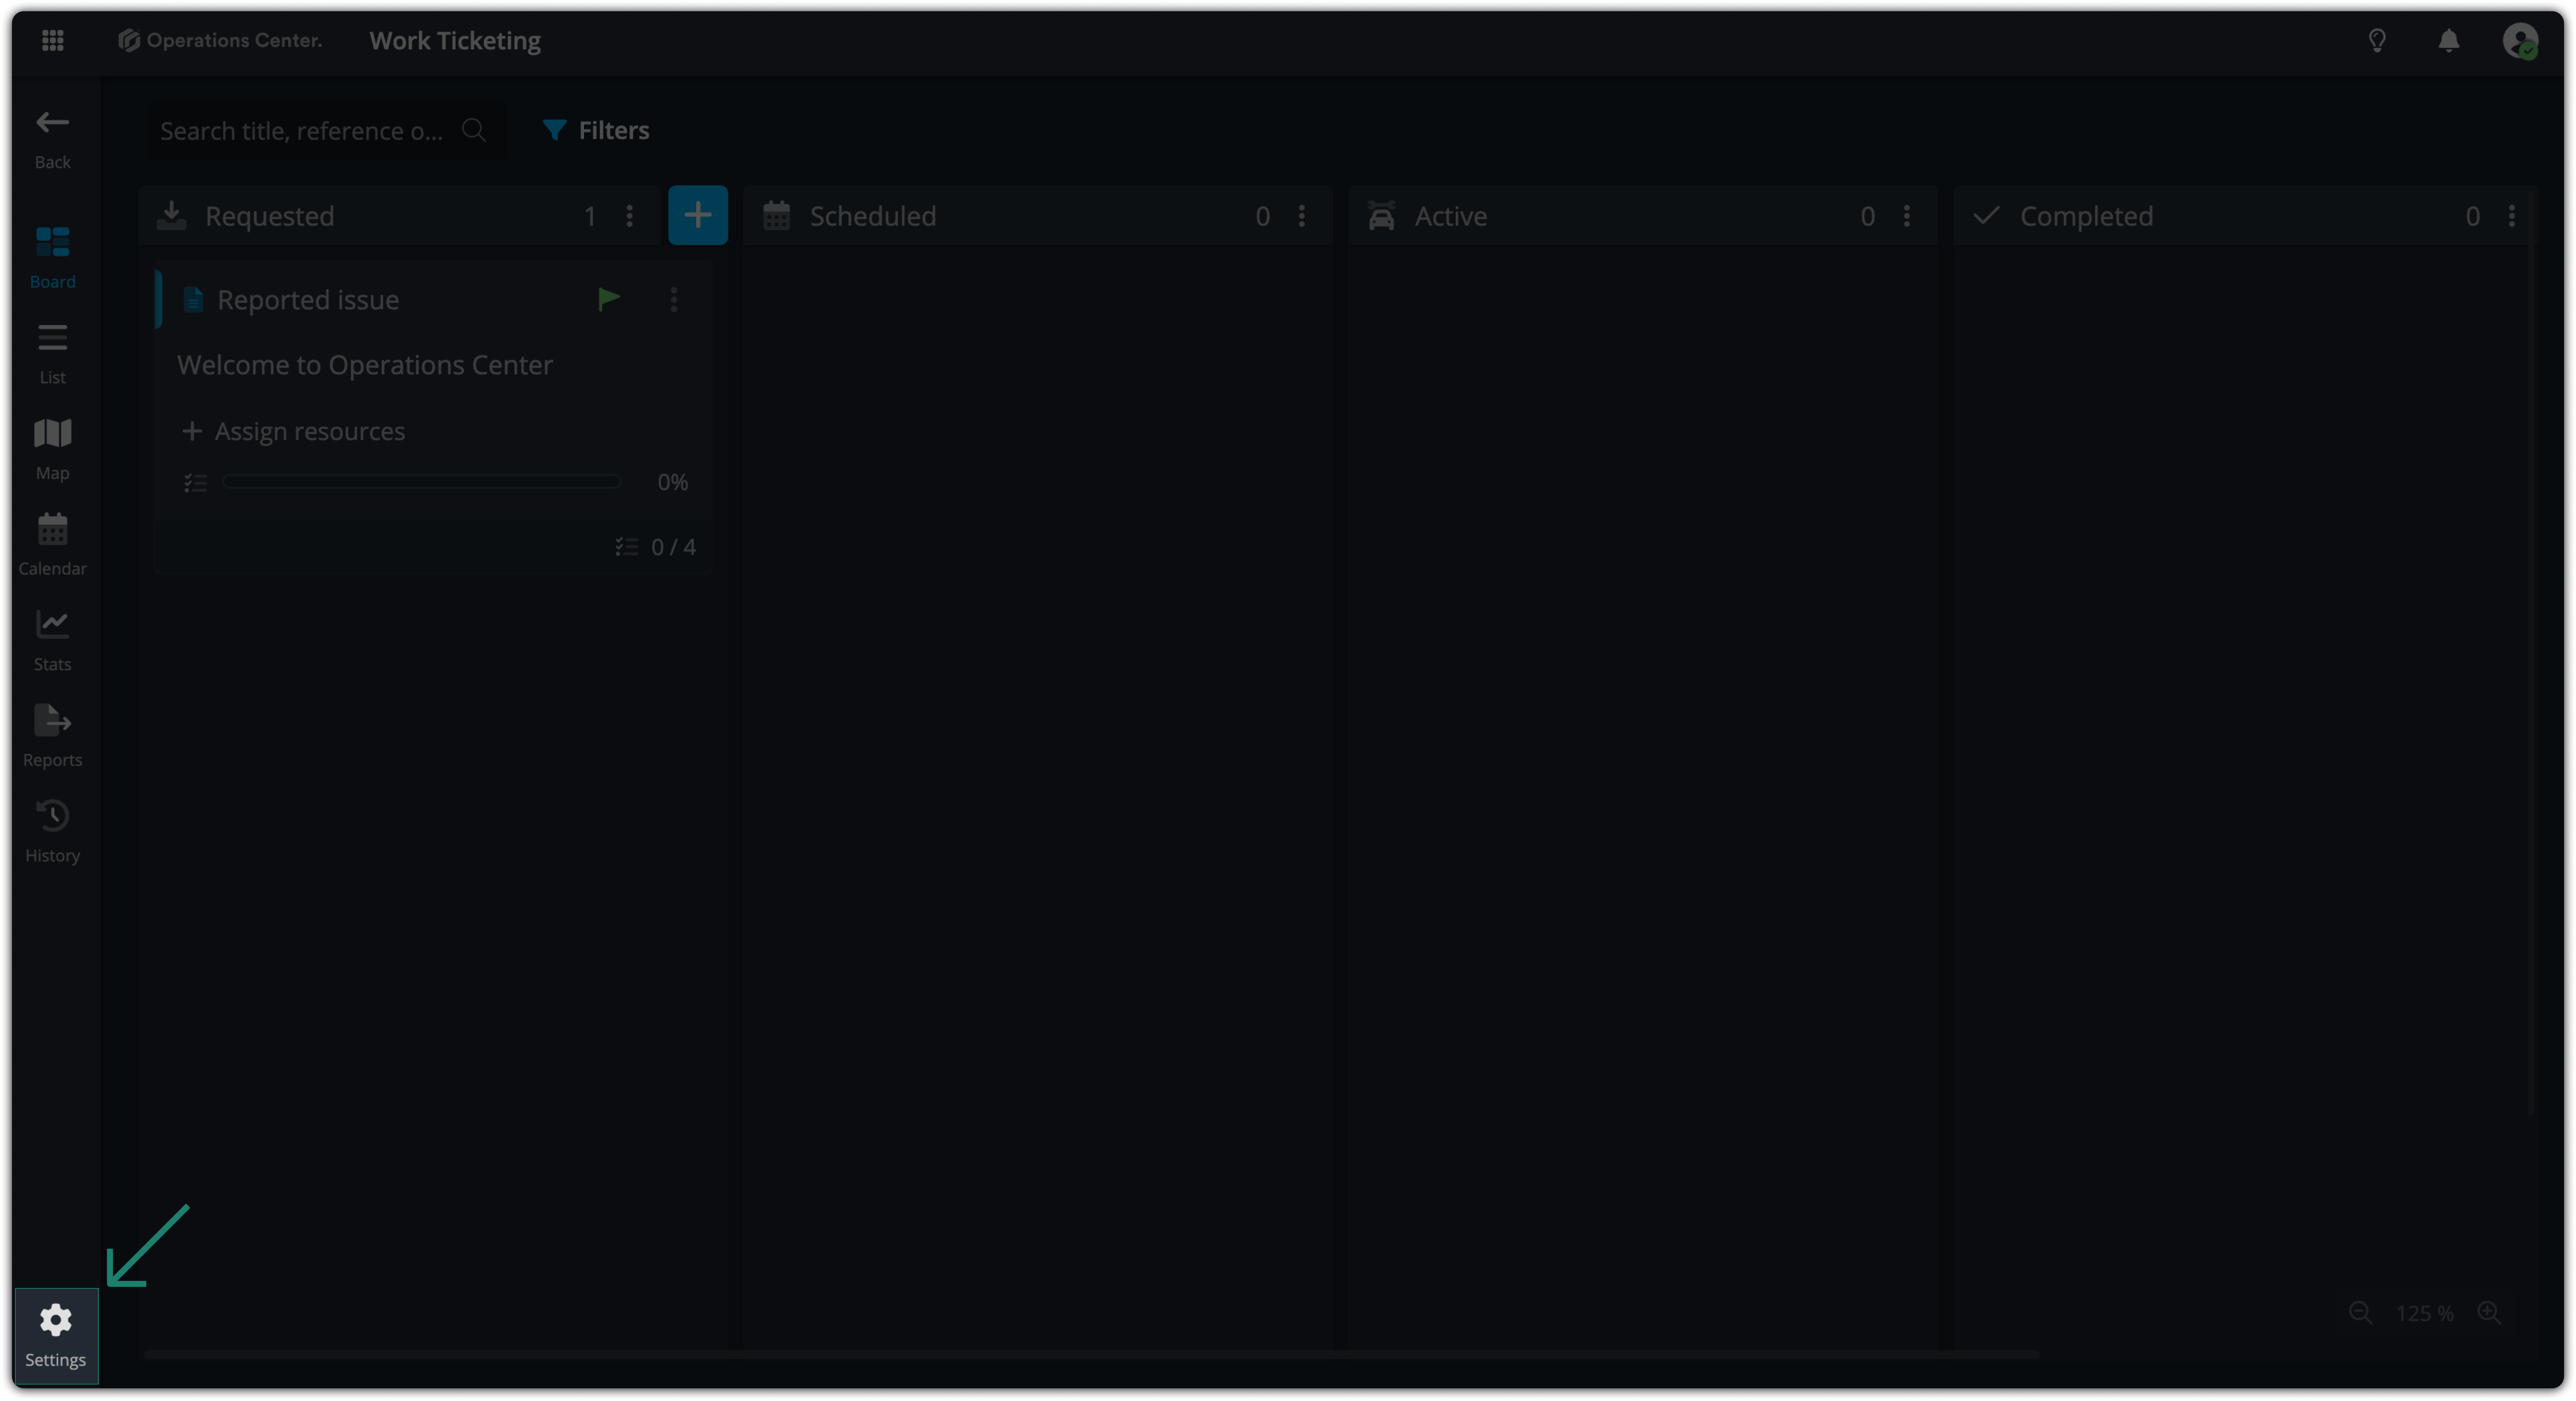
Step 2. Tailoring the Board to Match How Your Team Works
By default, the Work Ticketing template includes four columns that represent a typical workflow:
- Requested
- Scheduled
- Active
- Completed
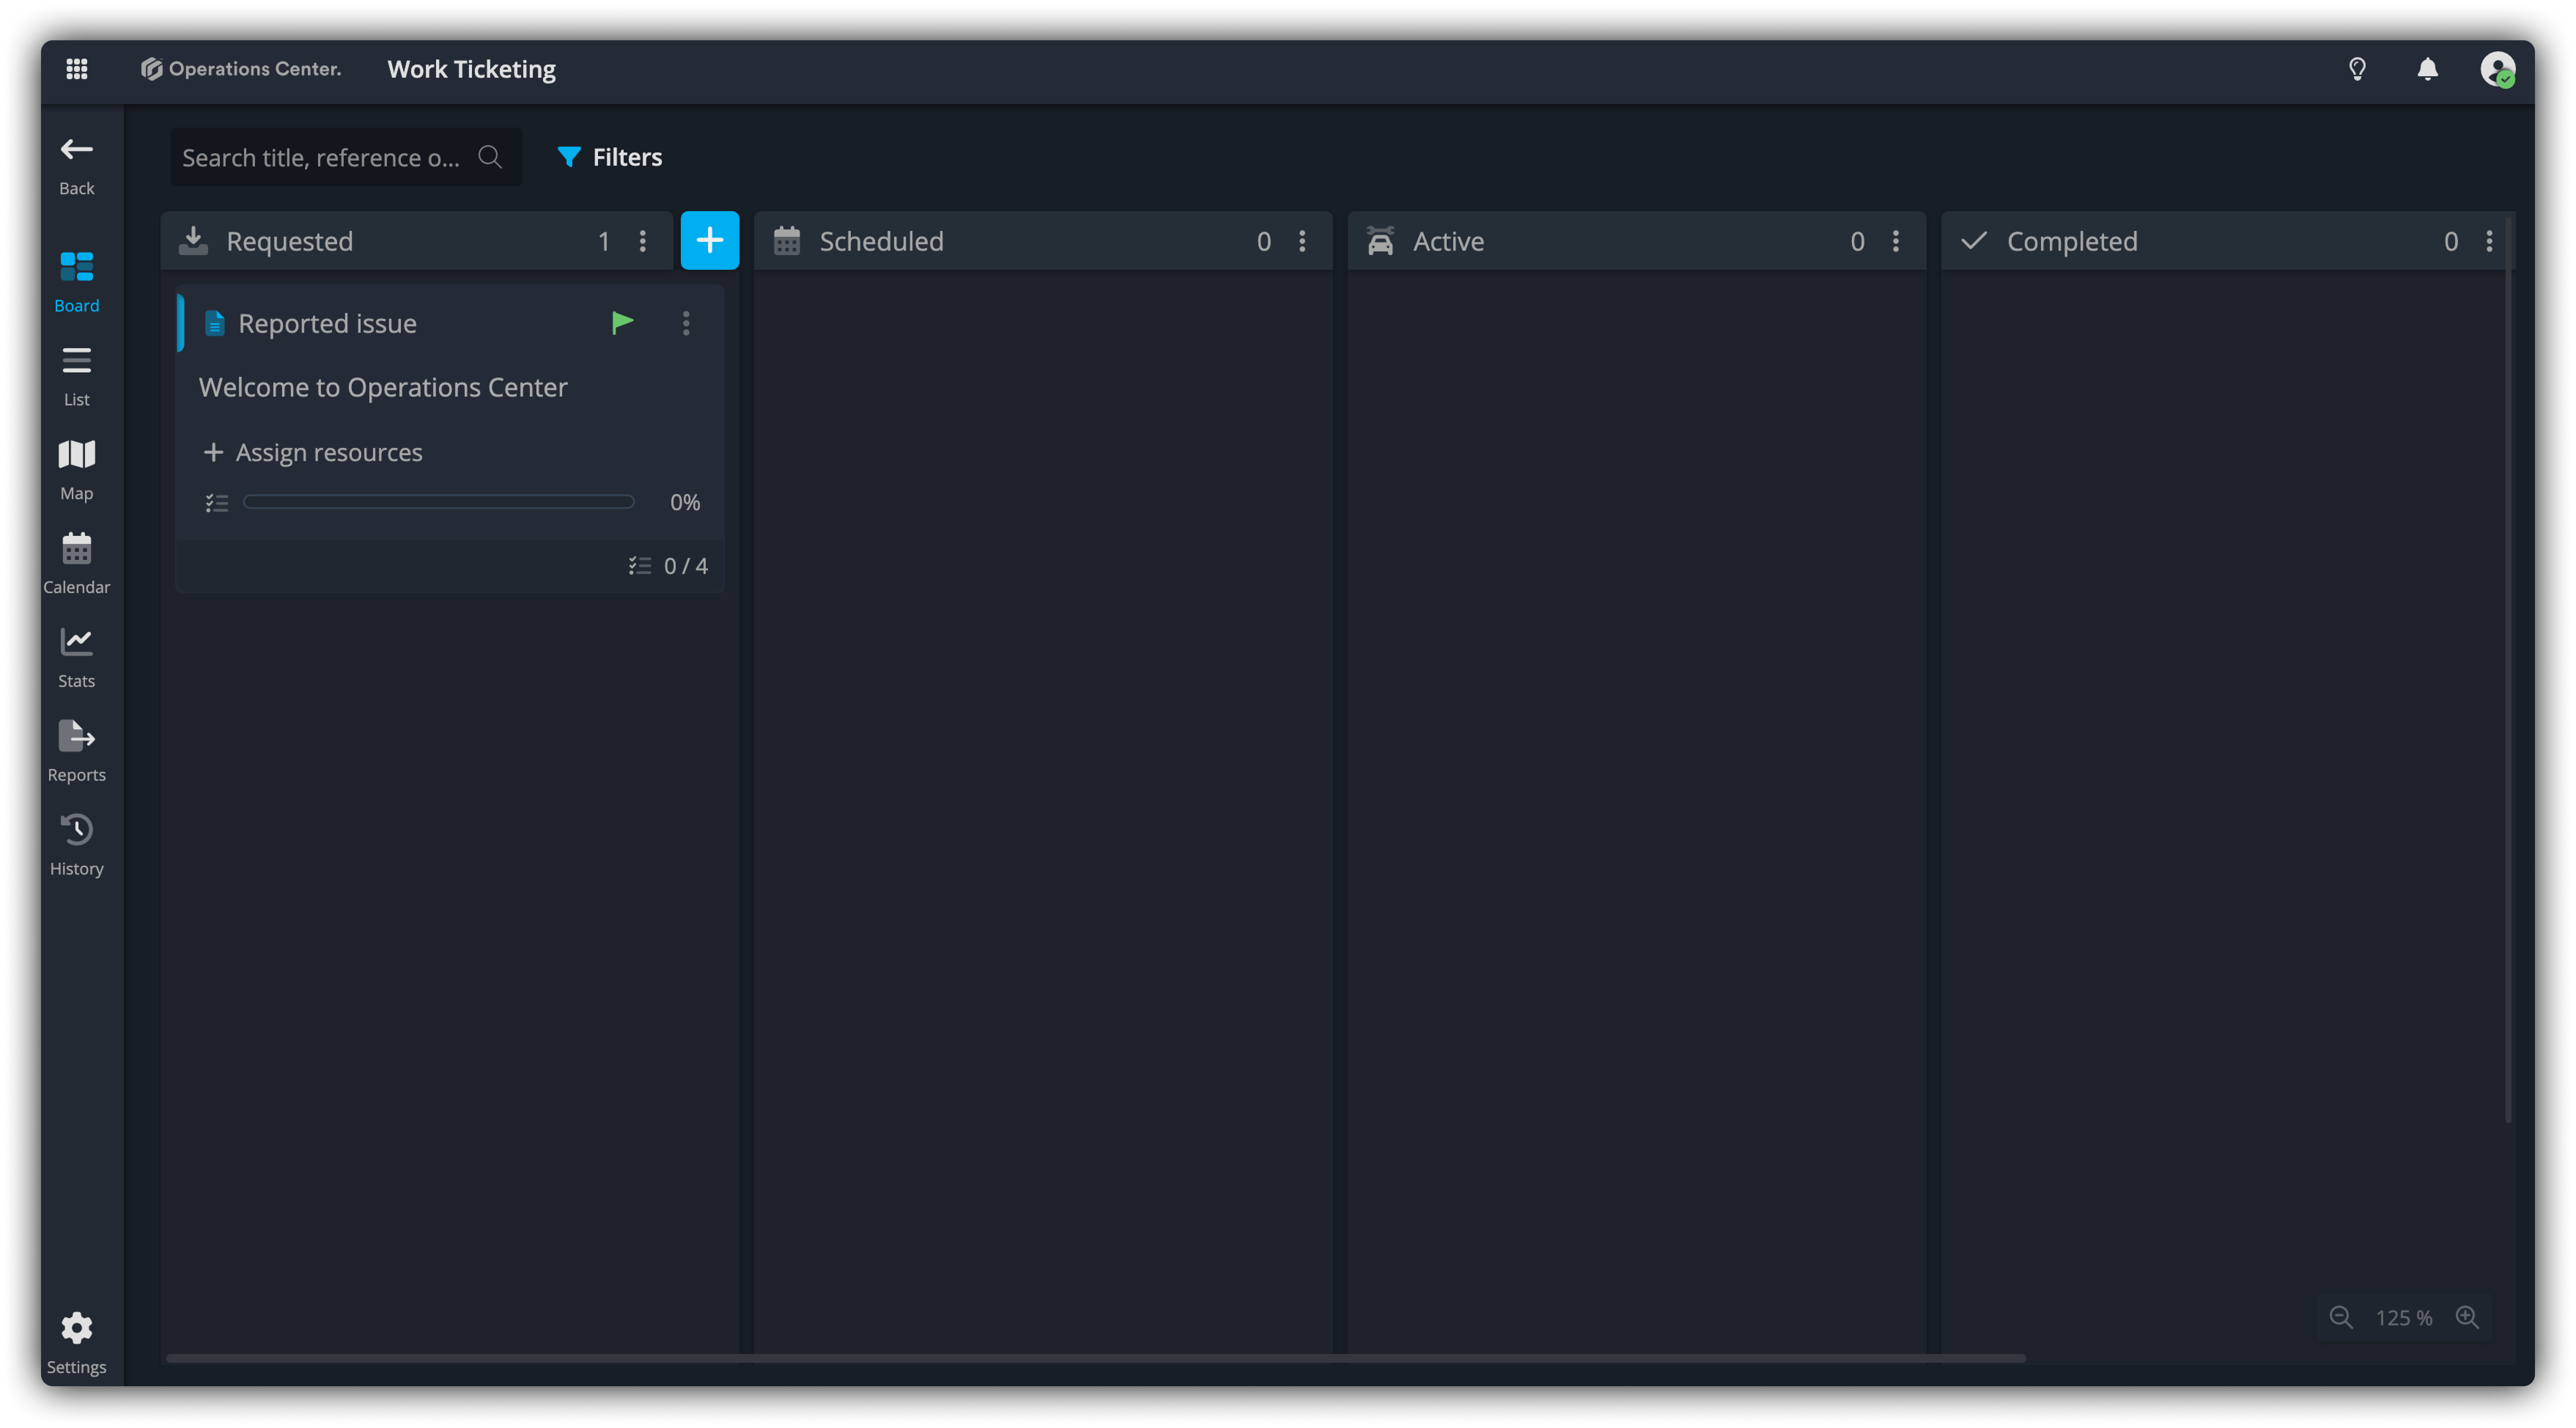
But every team works a little differently.
Ask yourself:
Does the team schedule tickets in advance, or do they just pick up one at a time and start working?
If scheduling isn’t part of their process, feel free to remove the "Scheduled" column. The goal is to make the board reflect the way your team actually works—not how a generic template is set up.
Also consider:
Do the column names make sense to your team?
If not, update them! Clear, familiar labels make the board easier to understand and use day to day. We have a dedicated post on how to customize boards here.
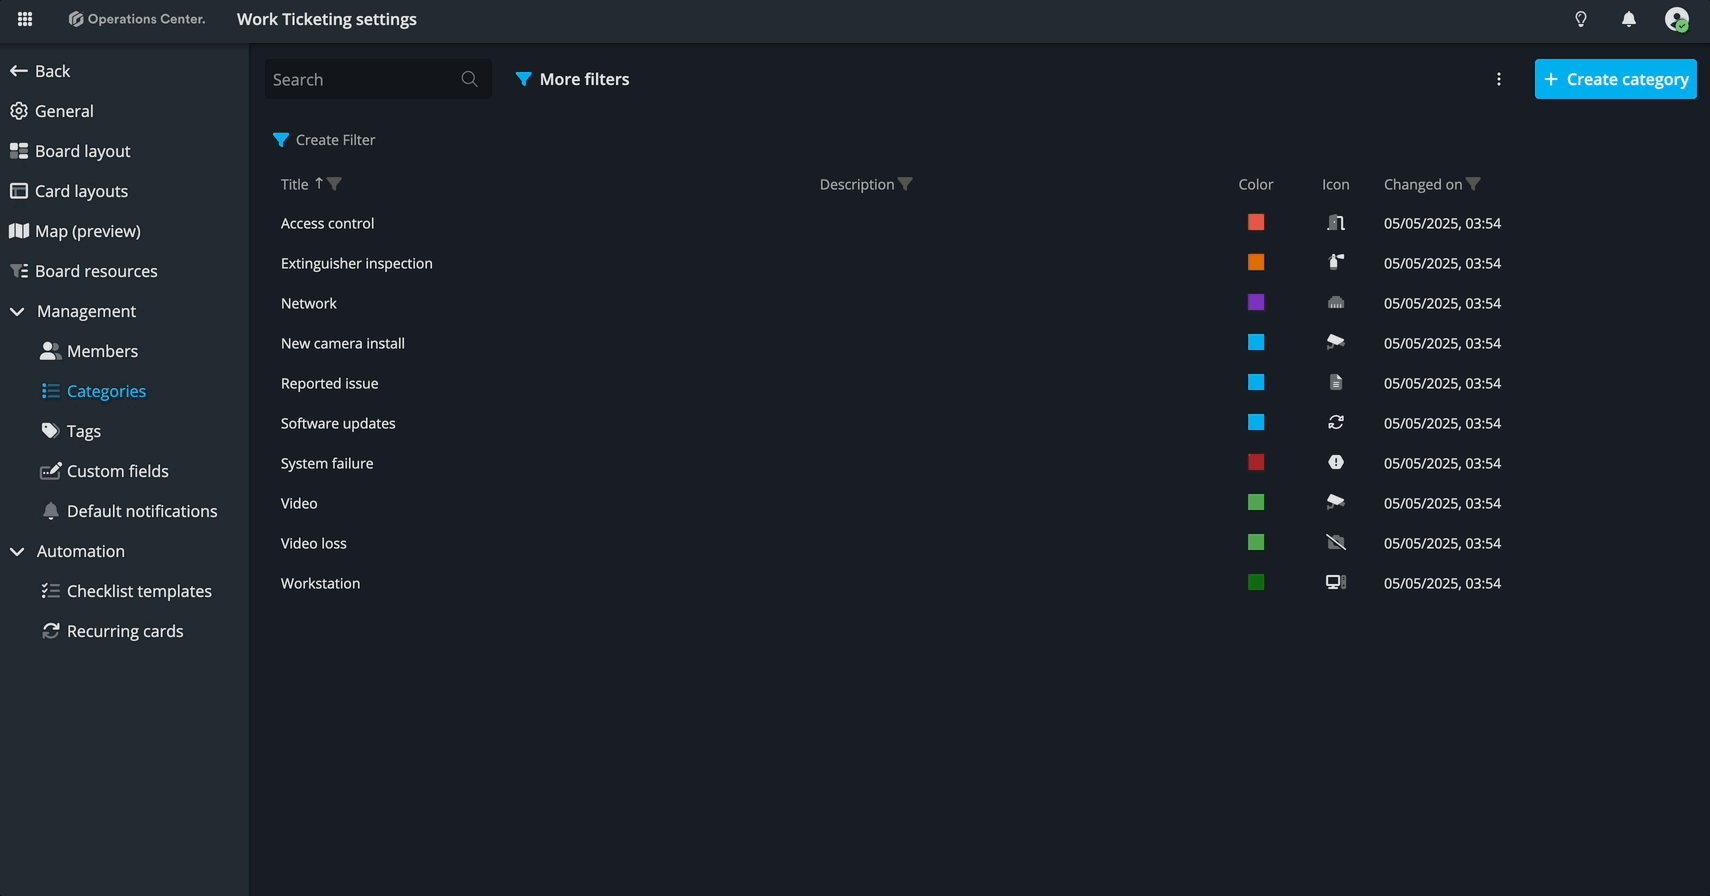
Step 3: Define the Work – Using Categories and Fields
Once your board is structured, the next step is to think about the types of tasks or activities your team handles. These become the Categories on your board.
For example, common tasks in a Work Ticketing scenario might include:
- A camera going offline
- Doors not locking or unlocking
- A workstation not operating
These tasks are already represented in the default categories provided by the board template.
Now, let’s say the team also handles badge replacements—this is a different kind of task, so we’ll create a new category to reflect it.
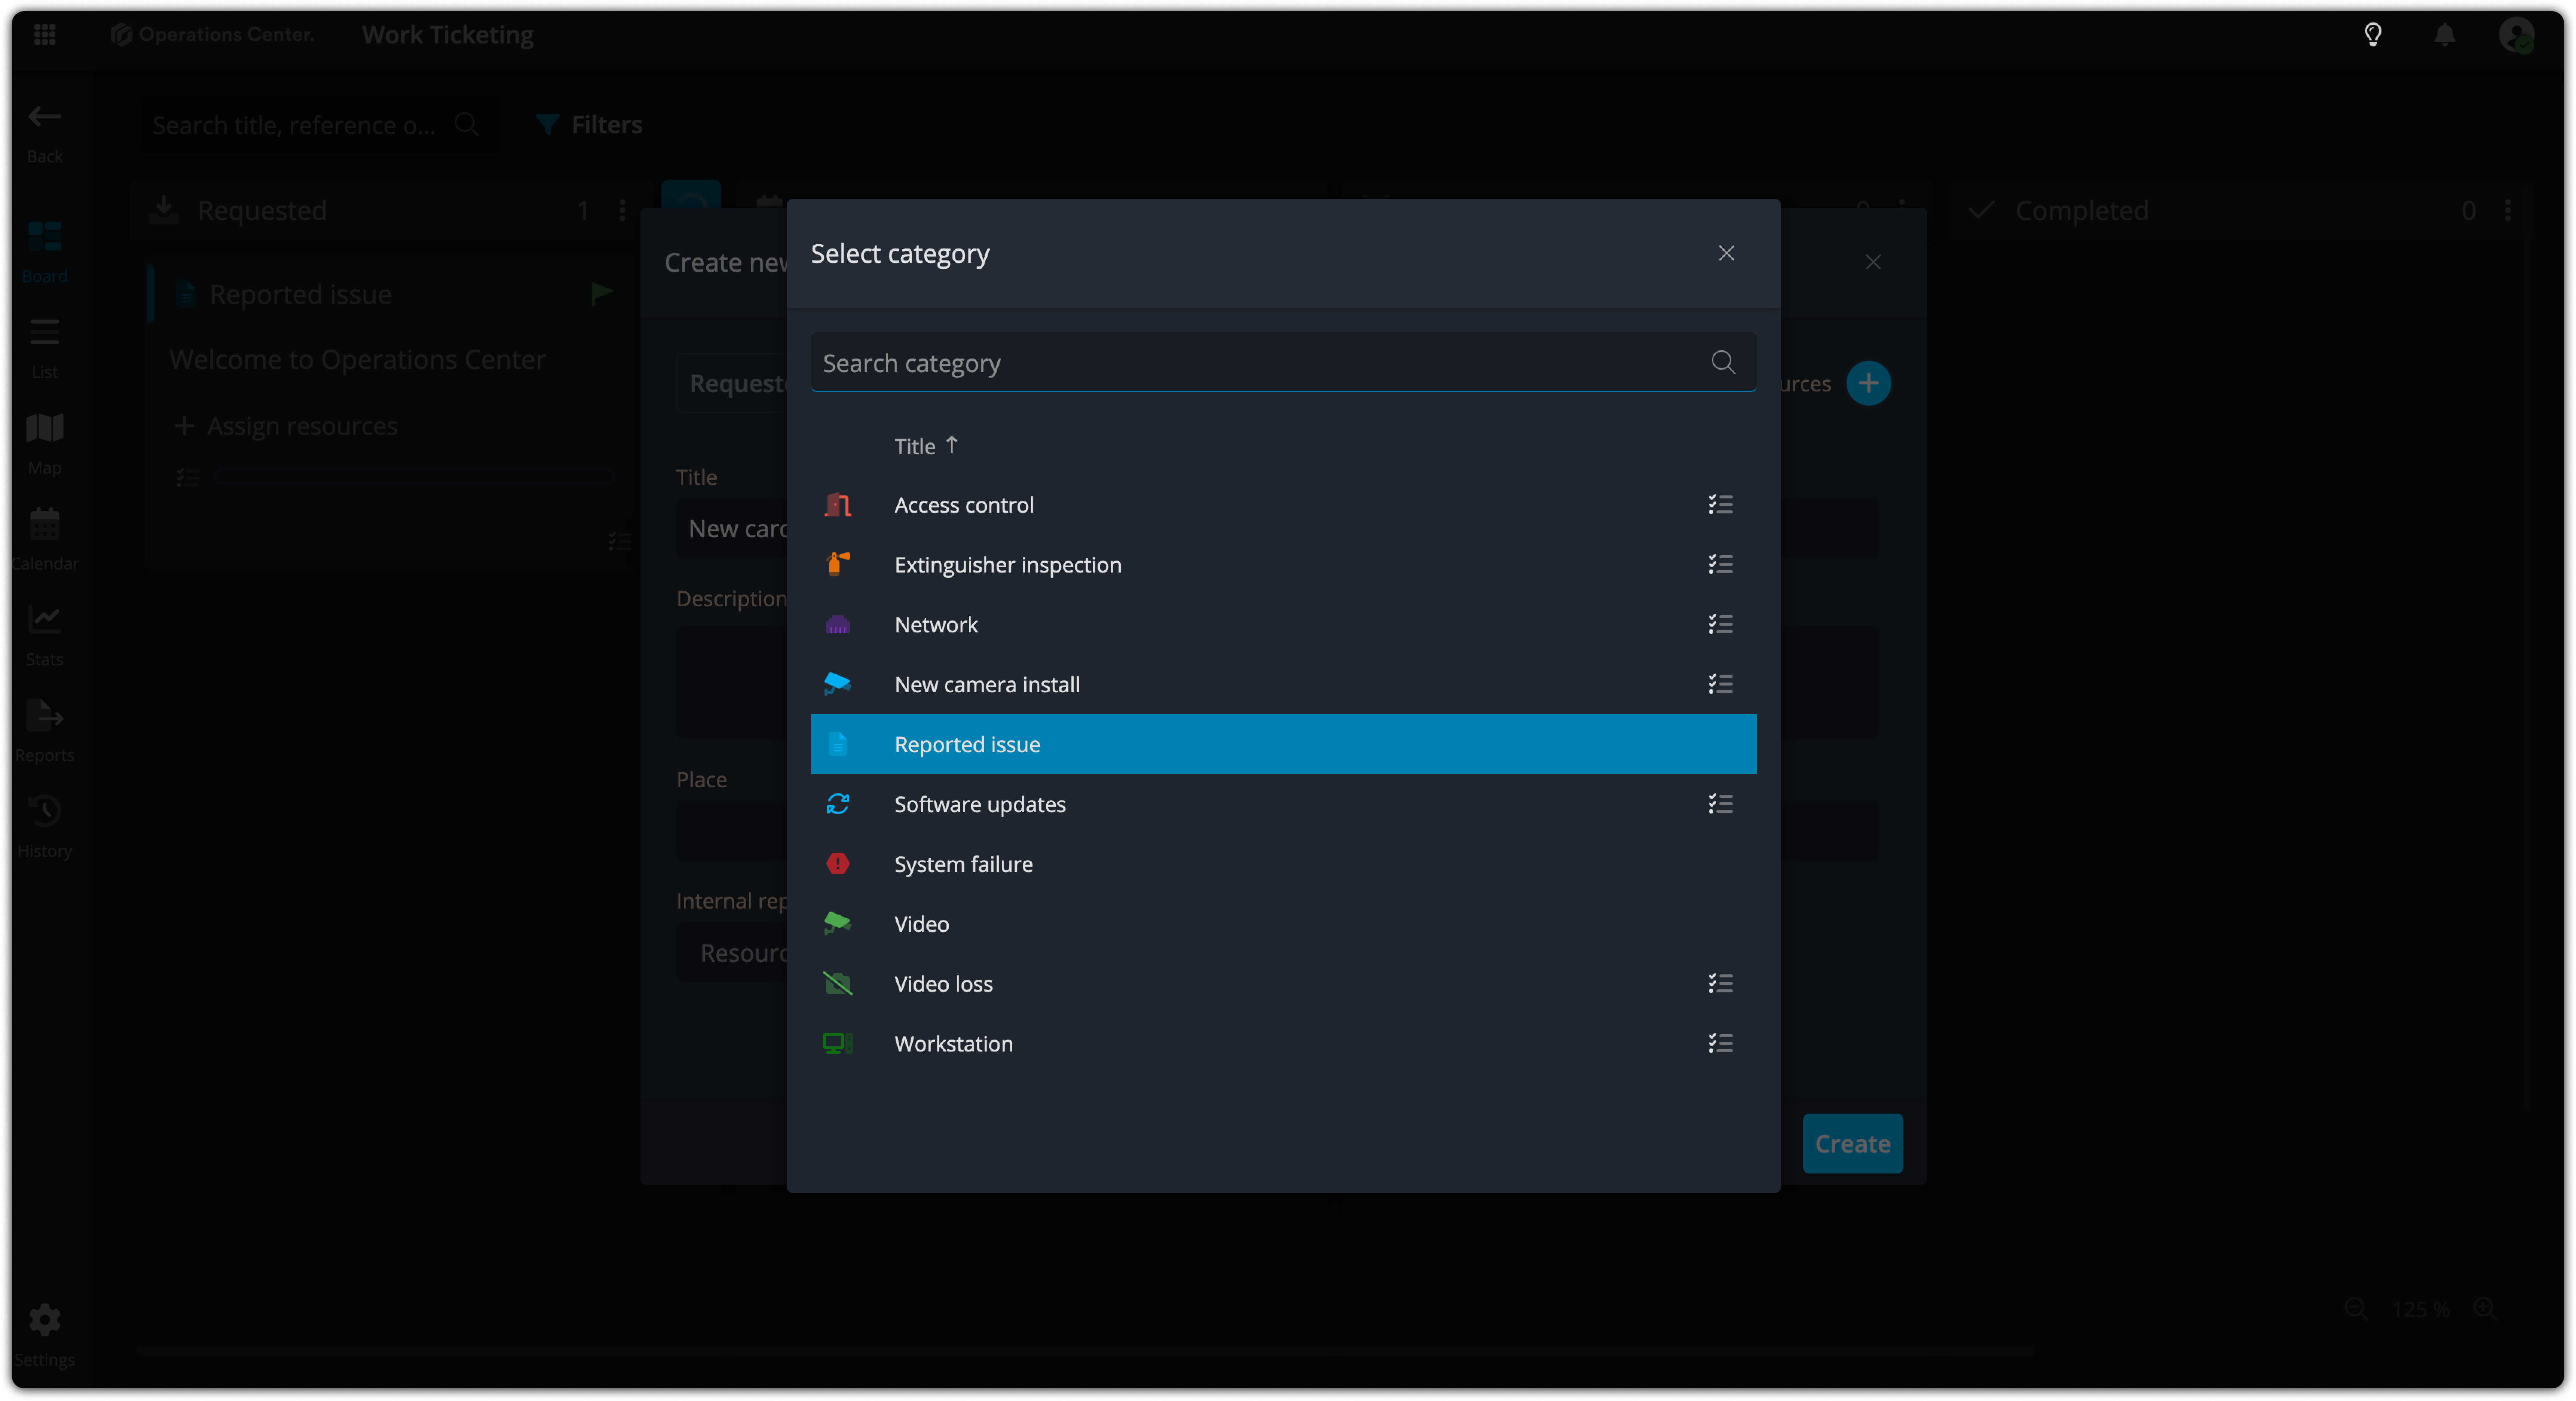
✅ Create a New Category: “Badge replacement”
- Open Board settings
- Go to the Category section of your board.
- Click Create new category.
- Name it Badge replacement.
Step 4: Identify What Info is Needed – Creating Fields
For each task type, think about the information your team needs to begin the work. For a badge replacement, you’ll likely need:
- The name of the badge holder
- The reason the badge needs to be replaced
- Let’s turn those into fields:
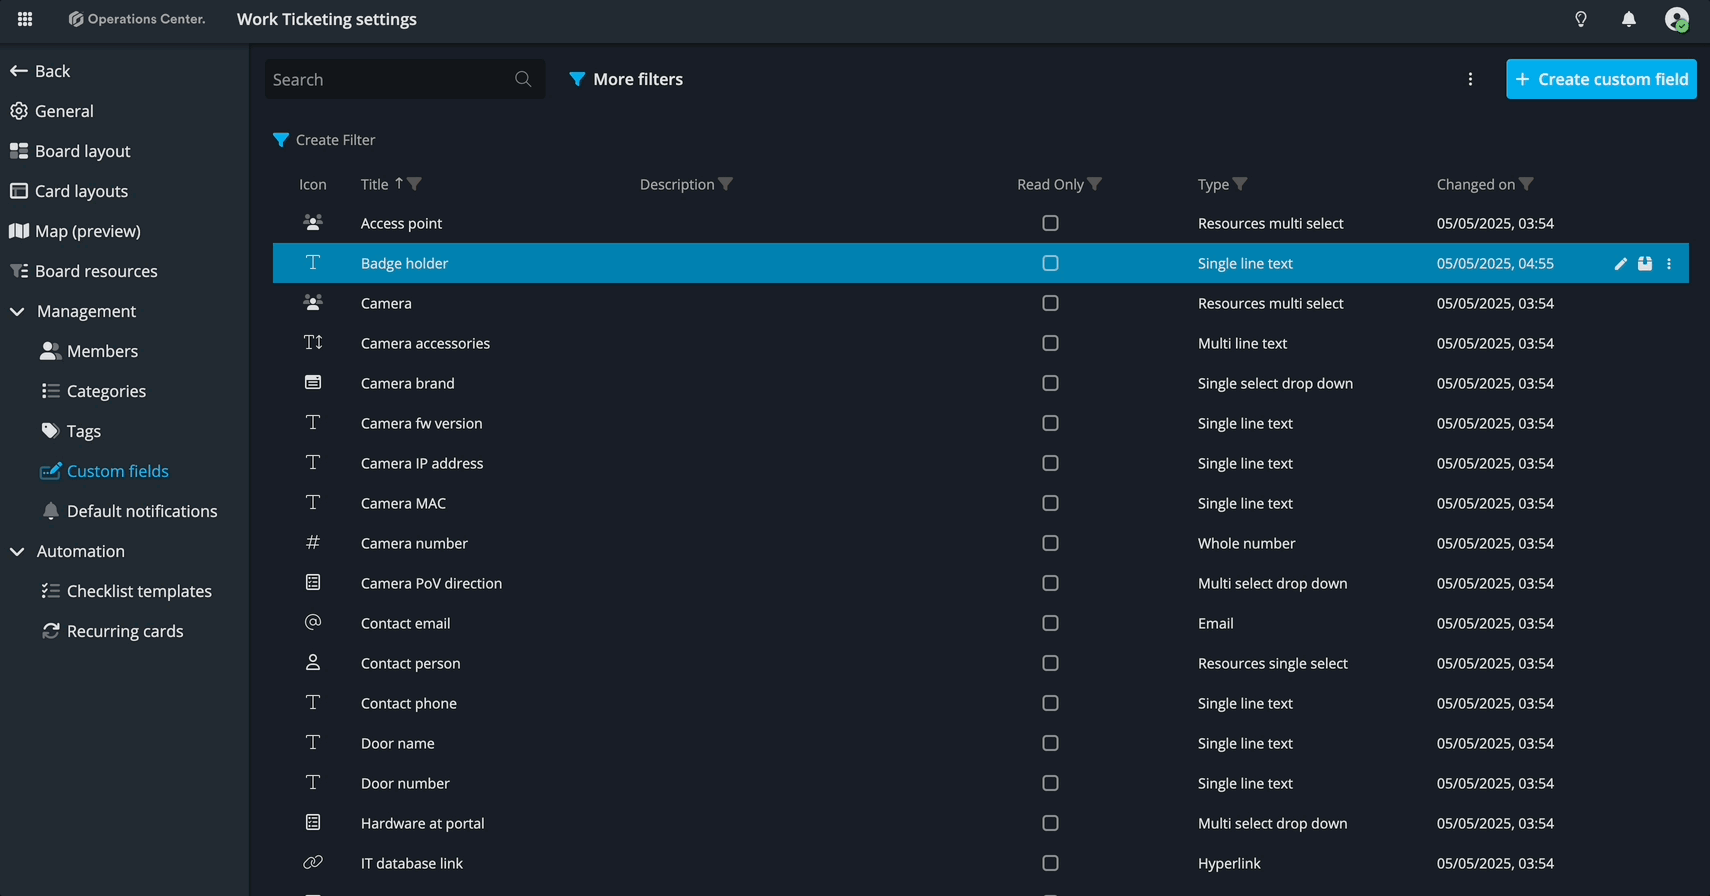
In board settings, there is a tab for Custom fields. Open that and create a Field: “Badge holder” and "Reason for replacement"
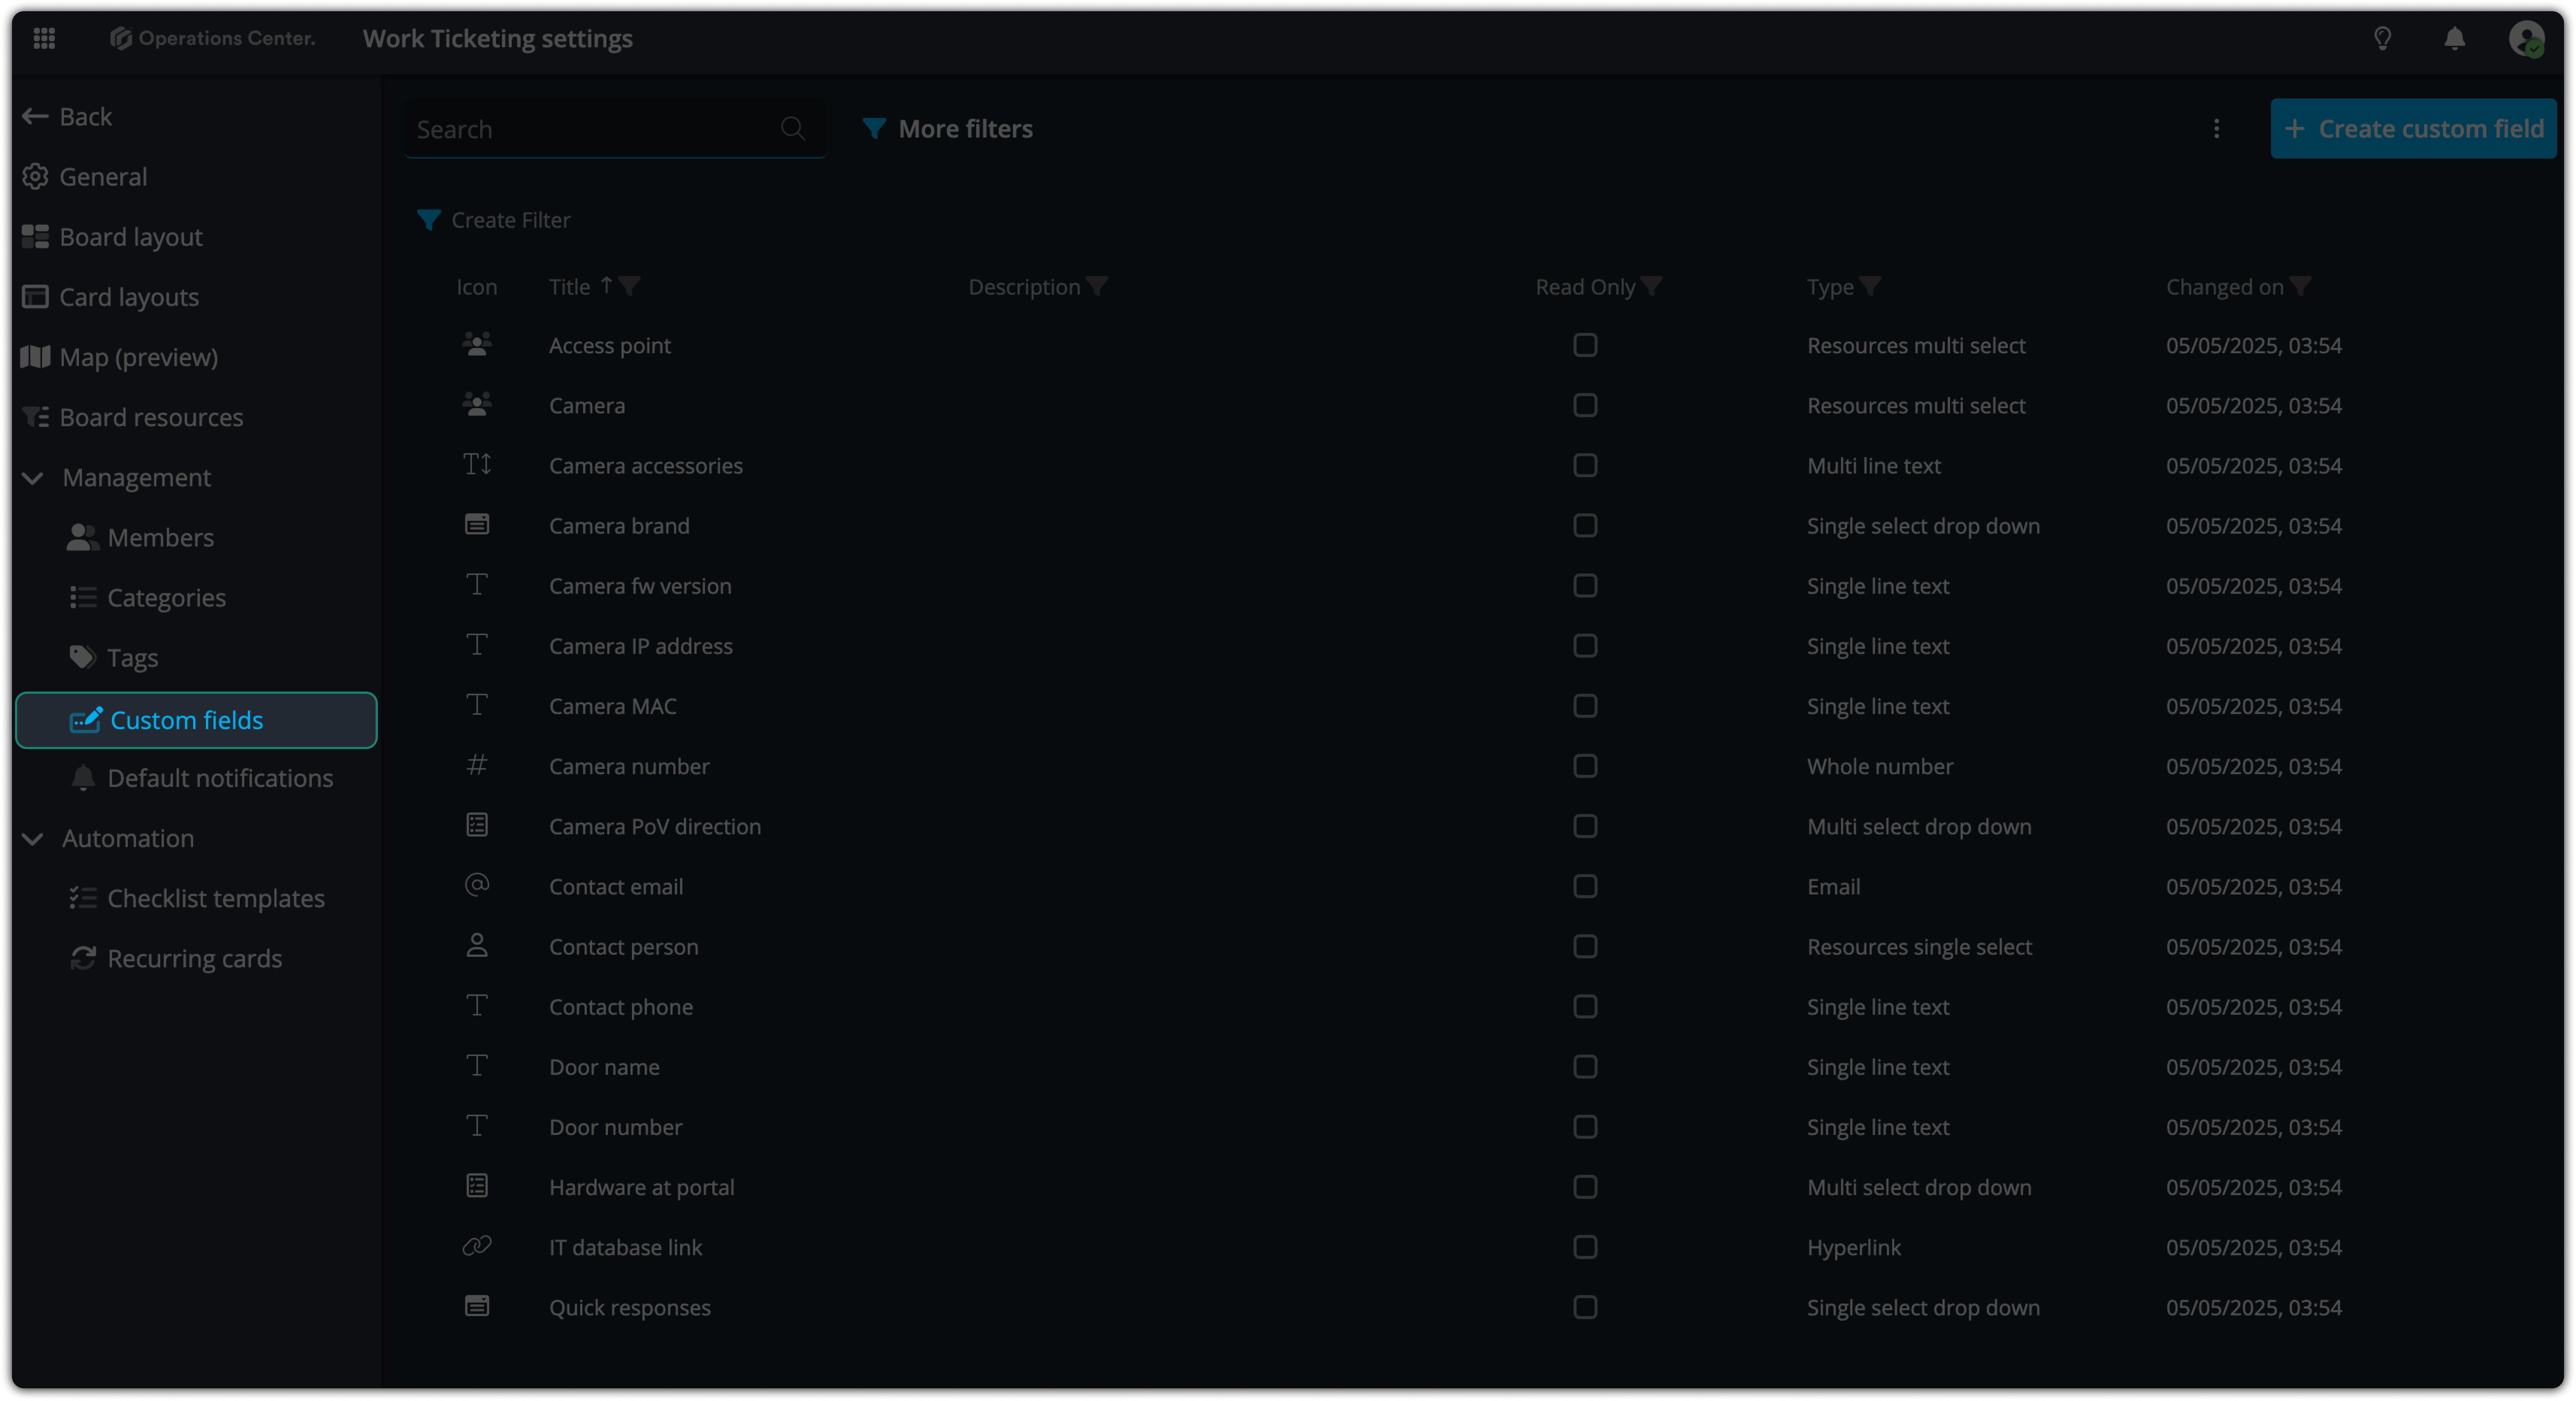
“Badge holder”
- Field title: Badge holder
- Field type: Single line text
- Purpose: To enter the name of the employee or badge holder.
Reason for replacement
- Field title: Reason for replacement
- Field type: Single select dropdown
- Values to add: Lost, Damaged
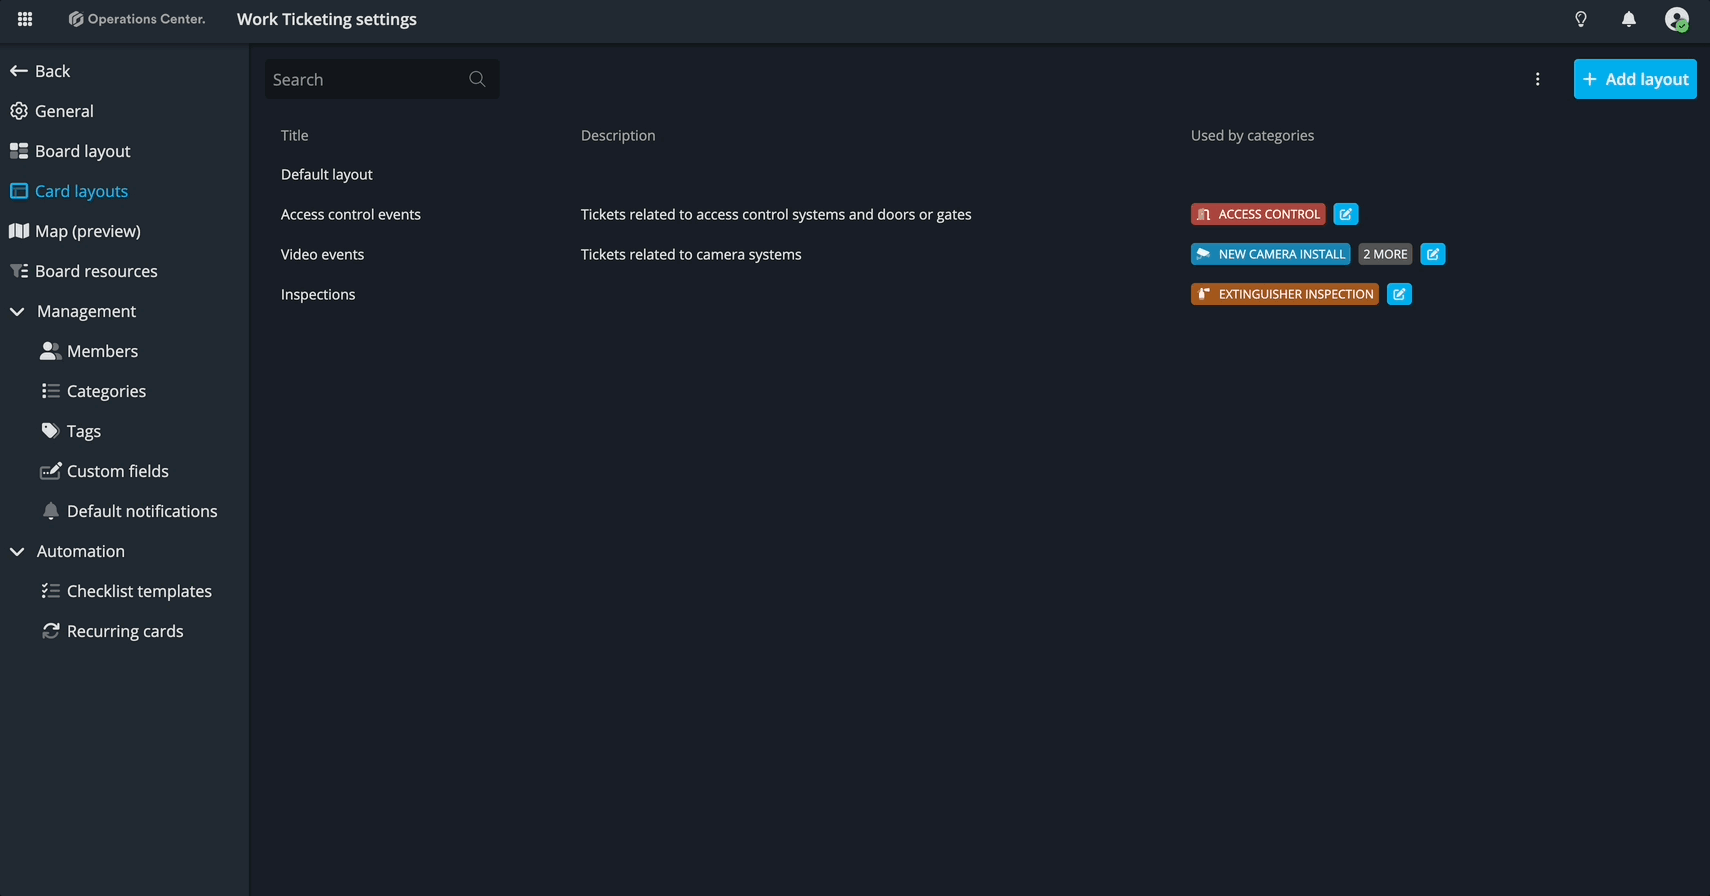
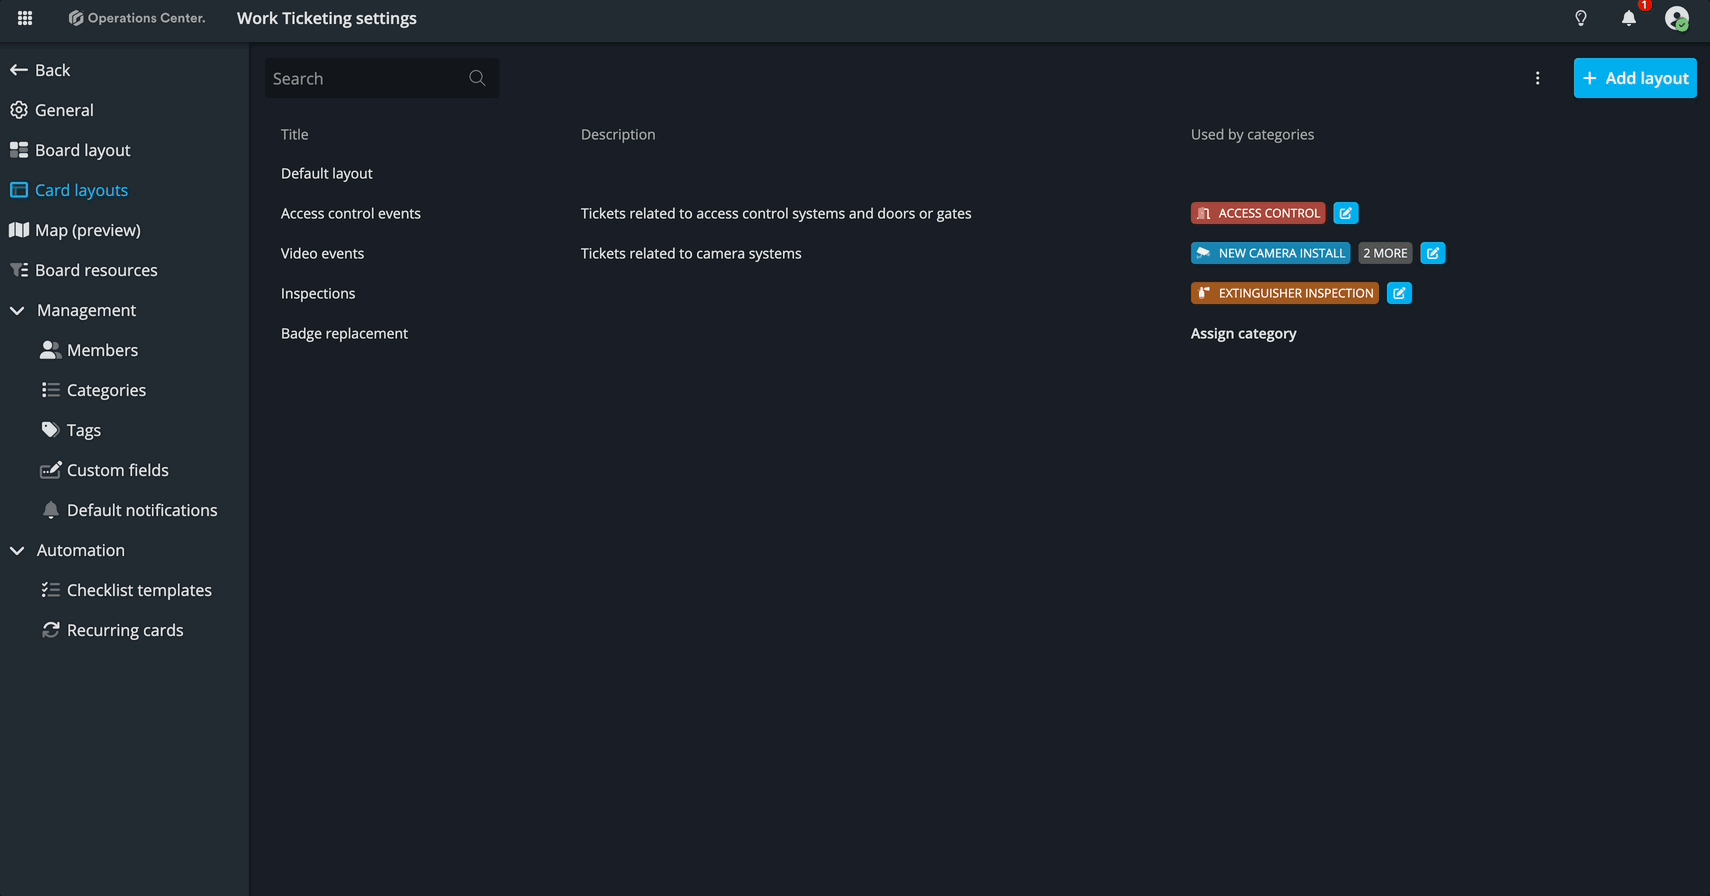
Step 5: Show Only What Matters – Creating a Card Layout
Now it’s time to bring all the pieces together so users only see what’s relevant to each task. Operations Center lets you customize what fields appear for each category using Card Layouts. Since badge replacements are quite different from the other categories, let’s create a layout just for that task.
Navigate to Card layouts tab inside board settings and create a Layout for “Badge replacement”:
- Go to the Card Layout section.
- Click Create new layout.
- Title it Badge replacement, then open the layout.
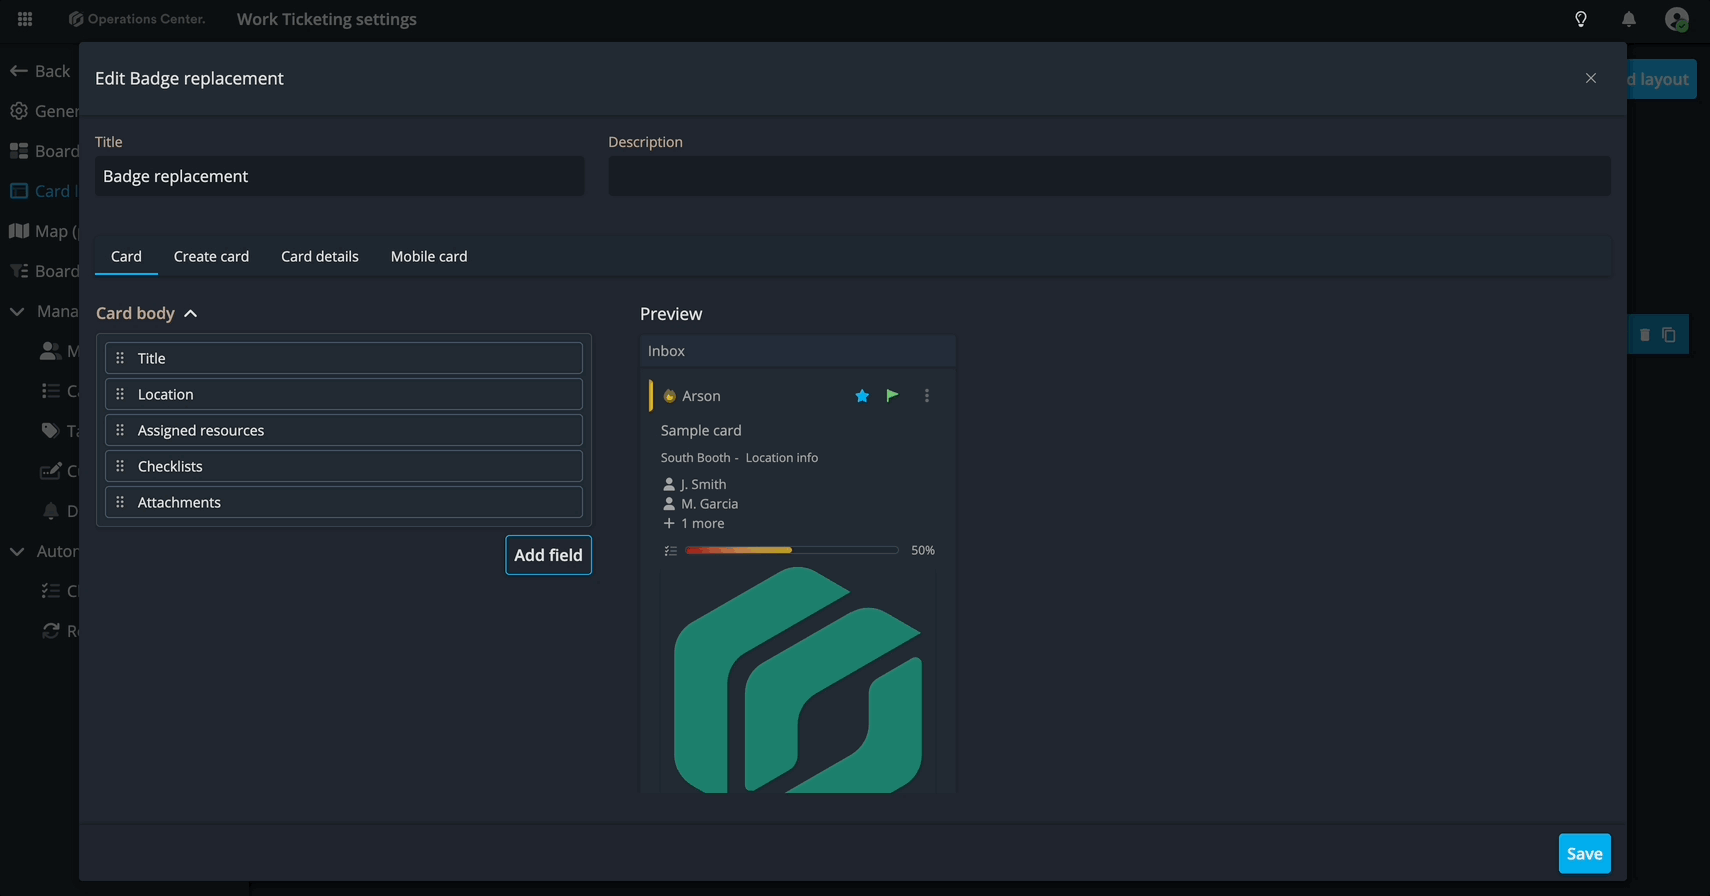
Inside the Layout Editor
Each layout has four tabs, but we’ll focus on the two most used:
- Card – controls what’s shown on the main board
- Mobile – controls what’s shown in the mobile view
In the layout editor:
- The left panel is where you drag and drop fields, rearrange them, and tweak display options.
- The right panel gives you a live preview of what the card will look like.
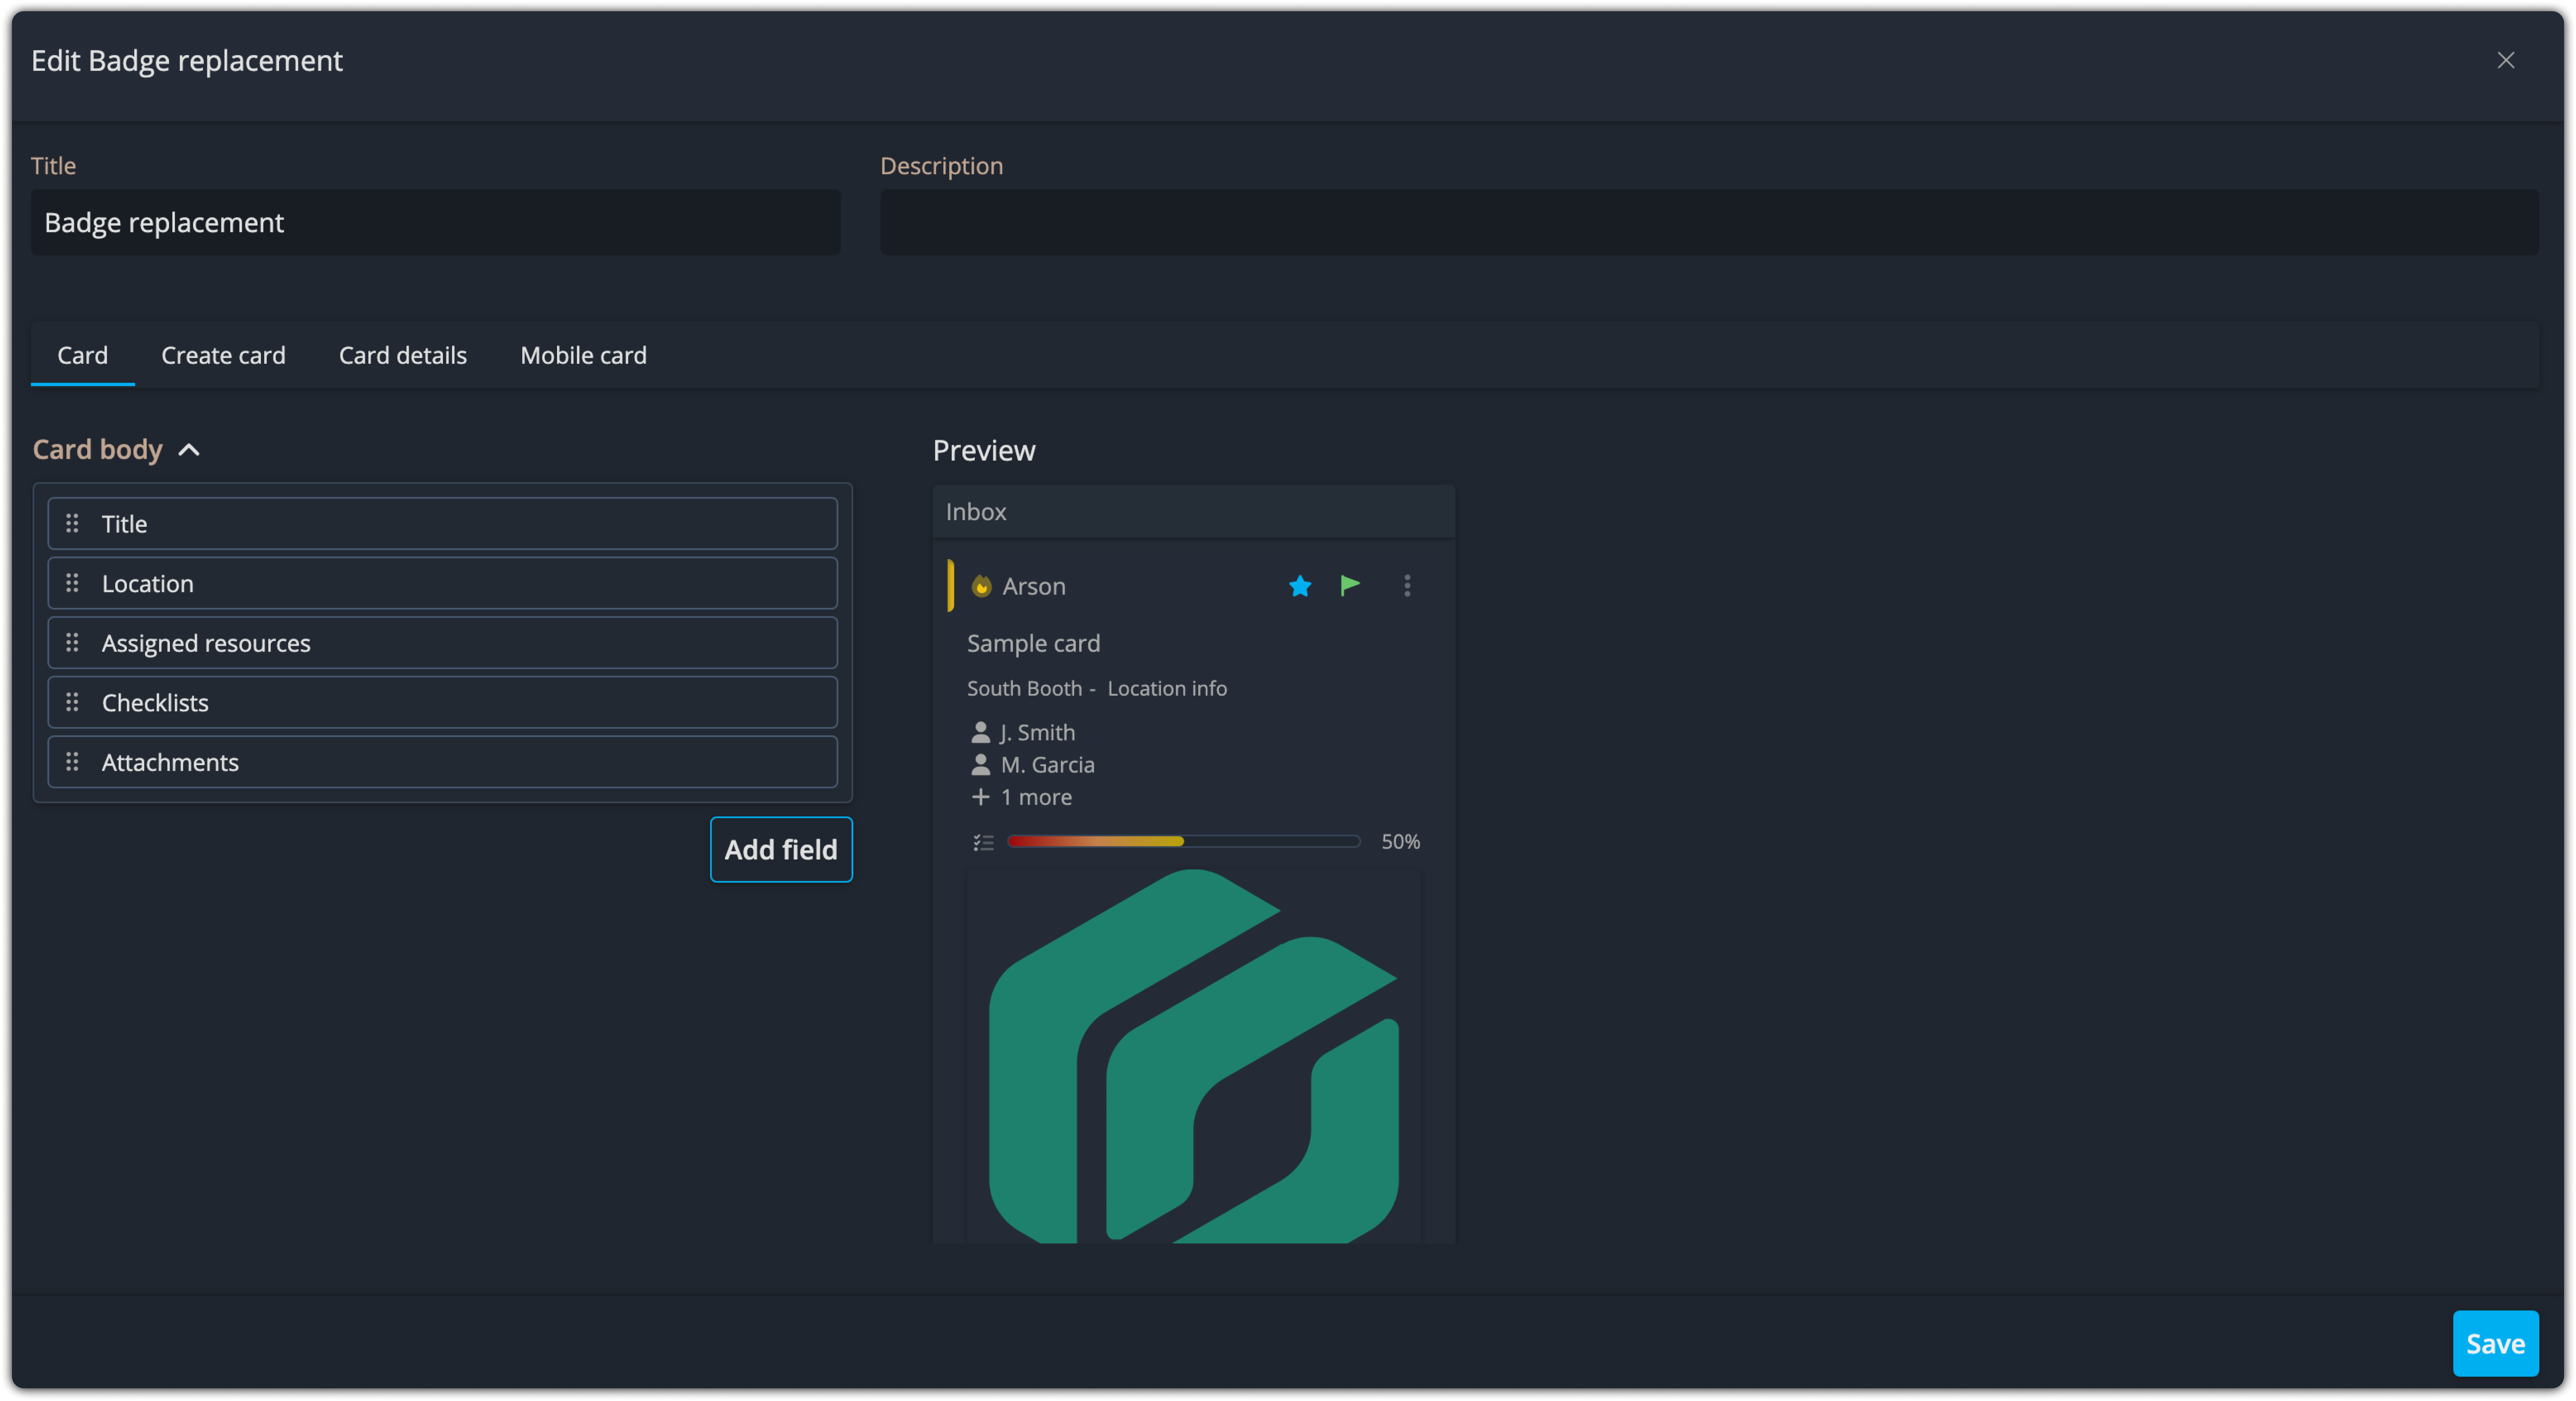
Use this tool to make sure your badge replacement layout is clean, simple, and intuitive for your users. If you want to lear more on card layouts, click here.
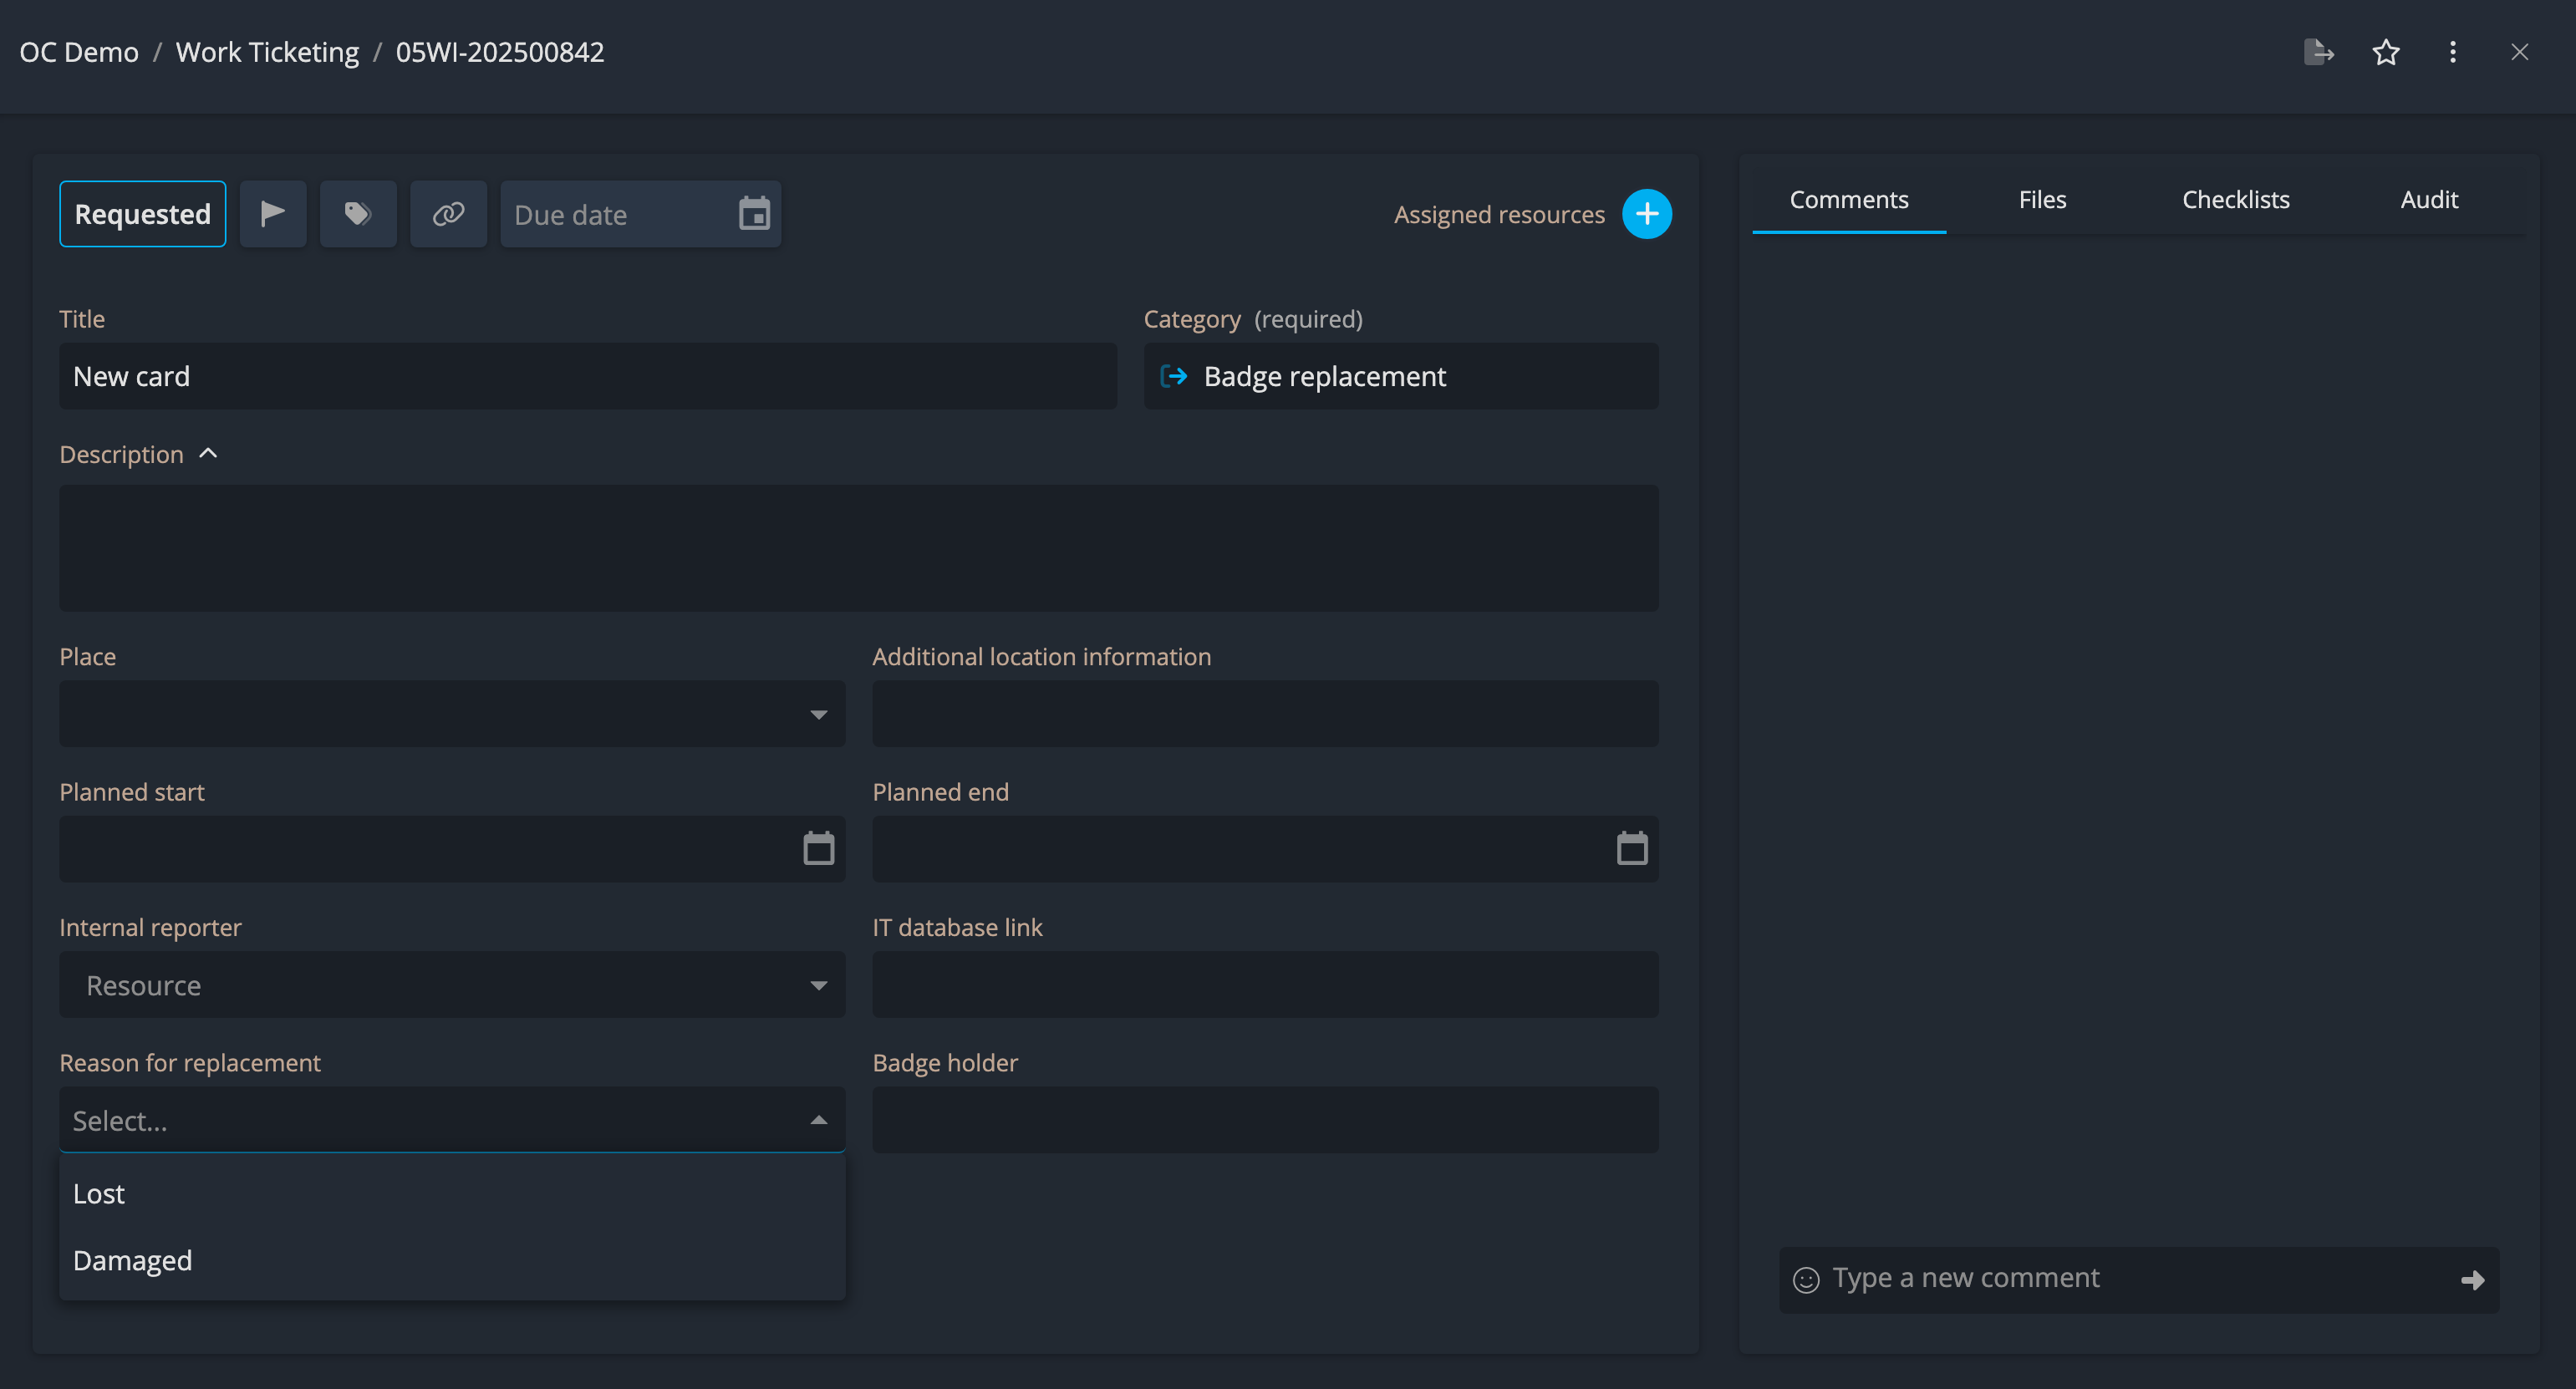
Step 6: Capturing the Right Info – Create Card and Card Details Tabs
Once you’ve built your layout, it’s time to decide what fields users should see when creating a card and what details they should fill in later.
The “Create Card” Tab
This tab defines the fields a user sees when they first create a task. Think of it like this:
What information would the user know—or need to collect—right at the beginning?
Having these fields available up front helps guide users through the call-taking process and ensures the right questions are asked. The faster information gets into the system, the faster your team can respond.
In our example:
We need to know who the badge is for, so make sure the Badge holder field is included.
To add the field:
- Go to the Create Card tab.
- Click Add field in the left panel.
- In the pop-up, scroll or search for “Badge holder”.
- Click the field name or the plus (+) button to add it.
- Close the pop-up and you’ll now see it in the layout preview.
The “Card Details” Tab
This tab defines which fields appear after the card has been created, during or after the work is performed. Think about what details your team needs to complete or document the task.
For badge replacement, we want to:
- Track the reason the badge was replaced
- Still show the badge holder for reference
To configure:
In the Card Details tab, add both:
- Reason for replacement
- Badge holder
This ensures the card supports not just the task itself, but also reporting, accountability, and billing if needed.
Step 7: Assigning the Layout
You’re almost there! Now that your layout is ready:
- Click Save to return to the Card Layouts section.
- Click Assign Category next to your Badge replacement layout.
- In the pop-up, select the Badge replacement category.
Step 8: Test Your Configuration
Let’s make sure everything works:
Return to your board and click New Card. Change the category to Badge replacement.
Confirm you see the Badge holder field in the creation window and create the card.
Open the card and confirm both:
Badge holder
Reason for replacement
...are visible.
If anything is missing, double-check the “Create Card” and “Card Details” tabs in your layout.
Success! You’ve now created an entirely new activity, complete with customized fields and layout.
🚀 Wrapping Up: Course Recap & Next Steps
✅ What You’ve Learned
- You now understand how to:
- Translate a real-world process into Operations Center
- Use boards, categories, fields, and layouts
- Configure workflows based on how your team actually works
📘 What’s Next?
- Continue adding new tasks and categories for your team.
- Explore Checklist Templates to guide users through SOPs.
- Use recurrences to schedule future work.
- Try in-app workshops to expand your knowledge over time.
📎 Resources
Documentation on boards, categories, fields, and layouts
Other training modules for deeper learning
In-app workshops: Use triggers and suggestions to surface helpful tips or training based on activity
🆘 Need Help?
Email: OC-support@genetec.com
Use the in-app support tool